Showing posts with label holiday gift. Show all posts

Tuesday, December 23, 2014

A Gift from the HeART by Linda Kay's Art


What a wonderful way to share the love you feel for friends and family by making a handmade gift. Something that will show them, every day, that they are well thought of and loved.


This is what I did for some very special friends who saw me through a very difficult time recently.
I needed a simple, economical yet meaningful gift to give to my friends as a small token of my gratitude. I chose a heart.


I was perusing Pinterest recently for ideas and found a 4 sided heart ornament made of paper that I instantly fell in love with. So, to make it very personal, I chose a 3 sided design as that is a special number for me and holds deep meaning that I wanted to embed in my gifts.

Now I went into production mode!

After cutting out a bunch of hearts with my Cricut machine, I went about and put these heart ornaments together. First I creased a line down the center with my ruler and bone folder.


I gather a lot of soft colors and pretty designs for my hearts as I wanted to reflect my loving thoughts with sweet colors and patterns.


I cut lots of fibers to use as hangers and set them aside.


Choosing which ones worked well together was a lot of fun. I worked on a crafting mat to help keep the mess manageable. 


Using Modge Podge and a 1" flat brush, I started pasting them together. One heart laid face down, the other two folded in half and matching edges with the first.


Laying the folded fiber hanger in half, I placed it in the center of the remaining side, laid on enough glue and squeezed the pieces together keeping the hanger as close to the center as possible. Some of them were a bit lumpy and bumpy, but I didn't think that hurt any of them. I just made sure to fill them with good thoughts of love and hugs!


I let them dry overnight and hoped my cats would not try to run off with too many of them. They really like to sleep on this table and love yarn even more!


I tied on some shiny beads; one on the top, two on the bottom.


I have a special ornament hanger that I got from Crate and Barrel last year which worked out perfectly for the display. It created quite a interest at my party where everyone was encouraged to pick one out and take it home. 


So, if you need to make a special gift on a budget and don't have a lot of time, these little hearts might just be the trick. 


Best wishes and Happy Holidays!

Linda Kay

Use these links to find me. 

And make sure to come by the FB group and share all your projects!!


Wednesday, December 17, 2014

Handmade Christmas Photo Ornament By Jill Lambert

Christmas and sweet memories go hand-in-hand (most of the time) and I love pulling out my box of ornaments each December and seeing the ones I've collected through the years.  The ones my daughter has made through the years are my favorites.  I also love the personal ones that have photos of my family as well as ones given to me as gifts.  When my younger nieces and nephews were born I decided to make them homemade ornaments for each of their first Christmases.  I know how much new parents love to receive something made just for them with a sweet picture of their baby on it so my first Christmas ornament usually involves something with a super cute picture of their baby as well as the name and year. This July our niece Charlotte was born so I'm excited to create a first Christmas ornament just for her that she'll hopefully have as she grows through the years.

Materials needed:
  • round wooden, flat circles (mine is 3 inches) - purchased from Michael's
  • gesso
  • acrylic paint, colors of your choice
  • glitter (optional)
  • stencil or stamp (optional)
  • Mod Podge or Gel Medium (I used Mod Podge)
  • photograph of person ornament is for 
  • (I printed mine on Epson ultra premium presentation paper, but regular paper would work fine, but be a bit thinner)
  • ribbon
  • glue gun

1.  Cover the wooden circle with a layer of gesso.  I do this so the paint doesn't get sucked into the wood.  It just makes a nicer layer for the paint to adhere to.  Let it dry and gesso the back side as well.

2.  Paint a layer of color of your choice over the dried gesso.  You can paint both sides the same color or two different colors if you want.  To keep it simple, I did the same on both sides, a deep red.


3.  I'm into fun patterns lately, so after your base color dries, I painted a pattern with a contrasting color using a chevron stencil.  Using a stencil is optional.  Of course, you can paint any pattern freehand too!  As you can see depending on how big you make the photo, your original background pattern may not show so much.  Decide how much you want it to show when you choose how big to make your photo.


4.  Size and print your photo.  Let it dry!  After it dried I even sprayed it with Krylon varnish so the ink didn't smear when I put Mod podge over it.

5.  Cut your photo to shape and size you want then put Mod Podge (or Gel Medium) under it, pushing out any air bubbles so it's smooth and flat.  Then put Mod Podge ALSO on top of the photo.  This is very important to seal it and allow you to paint possibly over and around it without ruining the photo.


6.  I painted/outlined the photo with a deep red and then I painted some Mod Podge around the edge and sprinkled white glitter around it to make it sparkle.  As you can see my chevron pattern is no longer showing that much, so the glitter is optional if you want your background pattern to show.


7.  On the backside I hand-painted her name, the year 2014, "first Christmas" and added a snowflake.


8.  After all is dried, varnish both sides for protection.  After that is dry then you can hot glue your ribbon on the back side.  Unfortunately I wasn't thinking about where the ribbon was going to go when I painted "first Christmas" so be sure you know where you want your ribbon to go so it doesn't cover anything important up.


I hope this gives you a fun idea that you can make as a gift or do with your children.  Family pictures from the year, maybe a fun vacation you took or pictures of the kids make great gifts for aunts and grandparents!  

This could even be the start of a new tradition - making a yearly, personalized ornament!

Find Jill's wonderful, bright artwork in her shop.

More about Jill can be found on her blog.


Wednesday, December 10, 2014

Holiday Shadowbox Project by Linda Kay's Art

I love holiday cards! Sending them, receiving them, but most of all, upcycling them into wonderful projects. They come in so many designs, sentiments and colors, it seems appropriate to make them last a bit longer. I enjoy making shadowboxes out of them and I wanted to share my process with you today. I hope you enjoy creating one too!


To make this project you will need to gather a few supplies:
 A good premade shadowbox or sturdy box or frame that will let you build layers, the size should not be too big for the images you use. A glass front is a nice thing to include.

Supplies:
  • An assortment of holiday cards, 
  • stickers, 
  • glitter, 
  • glues, (I used Tacky, Modge Podge & hot glue), 
  • transparent tape, 
  • embelishments,
  • fuzzy yarns & fibers, 
  • holiday charms, 
  • any item that you feel fits your theme. 
  • Window cleaner
  •  paper towels.


Optional supplies: 
  • cord and eye pins for making a hanger.


Tools you will need:
  • Good sharp scissors,
  • hot glue gun, 
  • bone folder or popscicle stick, 
  • ruler, 
  • pencil.


Optional tools: 
  • glitter catch tray,
  • non-stick crafting sheet.


Choose your images with similar themes & colors. Play around with possible layouts that enhance each other. Your focus point should be your very top layer, so choose items that go well behind it. Cut these out very carefully with very sharp scissors. Do a dry fit before commiting with glues. Use your ruler to double check sizes before your final cuts are made. 


If your shadowbox has a glass cover, be sure to clean this very well before you begin, inside and outside. I found that spraying the glass cleaner onto your paper towel is much better than spraying the glass. 


I have an assortment of glitters that I like to use. I found that vintage colors look best and give an aged appearance to my finished project. You can use any you really like. I also like the fine and ultra fine grades of glitter as it looks more size appropriate to the images.


I like to use a glitter catch tray when I am working with glitters. It helps to reduce waste and makes clean up a whole lot easier. I also use a very fluffy paint brush to coax the glitter back into its container. Choose areas that you want to highlight with glitter and dab bits of tacky glue sparingly on these areas. Good places to choose are snowcovered tree branches, tops of buildings, tops of snow banks, moon light on surfaces, etc. Cover the glue with plenty of glitter, let it sit for a moment, then gently shake excess glitter into the catch tray. Set aside to dry. If you don't have a catch tray, a sheet of waxed paper works well too. Return extra glitter back into it's container before starting another color or glitter size. 


Now you can glue your back layer into your shadowbox. I used a thin layer of Modge Podge on the back of the shadowbox and placed my background layer in, smoothing out wrinkles from the center to the outer edges. Be careful around the glittered areas so that you don't knock it off. My bone folder was helpful in getting many of the wrinkles smoothed out. Try to get as smooth as you can. A few wrinkles as I have here, do not matter too much. Just be patient and keep working on it with gentle strokes, as it takes a while to dry and this alows you some working time


.


Now the real fun for me begins! Embellishments are my favorite part. I can customize and add details till my heart is content. I found some translucent stickers that I could use on all my surfaces including the glass cover. This allowed me to add dimentions without adding much weight or bulk and being able to add it to the glass was a real plus. I used smaller stickers on the background and larger stickers on the front to add a sense of dimension. 


I did a dry test run with my Santa layer to be sure there were enough snowflakes spread all around. I also played with some plastic dimentional snowflakes and some embellished snowflake stickers that had little gems on them. Use as much or as little as you like. For me, the more, the merrier!!


After all my embelishements were in place, I twisted some eyelash yarn with a thin silver thread and used my hot glue gun to attach it on the inside of the shadowbox frame along the box edges. This is good for covering up areas that don't quite fit or lie flat. It helpes detract from some of the wrinkles too! Small dabs of glue are all that is necceary and the bone folder is helpful to push the fibers into the hot glue and save your little finger tips. 


To add a little movement to my shadowbox, I tied silver strings to some of the plastic snowflakes and hot glued them to the top of the inside of the shadowbox. Again the bone folder came in handy.

Look your shadowbox over and trim away any stray glue strings, fly away fibers and shake out excess glitter that has fallen loose. 


My shadowbox had 2 small brackets for holding the glass into place. These came in handy for my top Santa layer. I carefully loosened the bracket, slipped in Santa against the glass and tightened the bracket again. A few small strips of tape along the sides of the Santa cutout hold him still and in place. Close the cover and check all is holding well in place.


The last step is to embellish the front cover of your shadowbox. I used some German Scrap papers to line the frame top, bottom and sides. Any gaps were filed in with the embelished snowflake stickers. A bit of glitter glue was run on both sides of the frame embelishments for that added touch. Let these all dry well.


My shadowboxes have an easel back stand that makes displaying it easy. You can also choose to make a hanger with some cording and small eye pin screws. Simply decide where to place your eye pins on the right and left sides of the shadowbox, use a pin to start the hole and screw them in. Tie your cord onto each pin leaving enough room for the shadowbox to hang on the wall or on your tree comfortably. 

Santa Arrives


Here are a few of my shadowboxes that I've made recently. I have used cigar boxes, papermachet boxes and covers and drawers from doll house dressers. Use your imagination and come up with something creative and upcycled. 


Inside of Snowy Night

Snowy Night

Nutcracker
I hope you enjoy making your own holiday Shadowboxes this winter. It makes a great project to do on those very chilly days when you don't want to go out. 

Journey to Bethlehem

I invite you to come visit my website, blog and my Facebook page. I've listed the links below for your convienience. 

It's Snowing!


Best wishes and Happy Holidays!

Linda Kay
Joy!


Use these links to find me. 

And make sure to come by the FB group and share all your projects!!


Cre8ive Klatch


Monday, December 1, 2014

A Shopping Side Trip: The Klatchapalooza Handmade Art Market

Today is Cyber Monday for those of us who dislike crowds and want to shop in our jammies!

Today is also the last day of this event and we hope you'll come on over and take a stroll through our virtual "shops!"


You can also come on over to the FB group and chat with us about all things cre8ive!!


See you there!


Wednesday, November 26, 2014

Peace and Calming Perfume Pots by Lori Leissner

This has been one of our most popular posts to date and well worth sharing again.


This is the perfect Christmas gift or stocking stuffer. 

Enjoy!


I have become highly sensitive to scents. It's gotten bad in the last few years.  The laundry aisle at the Walmart can send me into a headachy, nose leaky, sneezy, itchy mess. But I recently discovered therapeutic grade essential oils. I have scent back in my life! Now I'm having some fun with them.


I can't believe how fast and easy this project is!  I don't cook very much, so I'm skeptical of any project that requires a live flame.  This was done, start to finish, in 20 minutes (not including decorating the top of the container), so it's perfect for quick gifts for lots of occasions.  Or you can do what I did and add it to a fun giveaway on your blog (hint...click the link, leave a comment and you might win.)


You'll need:
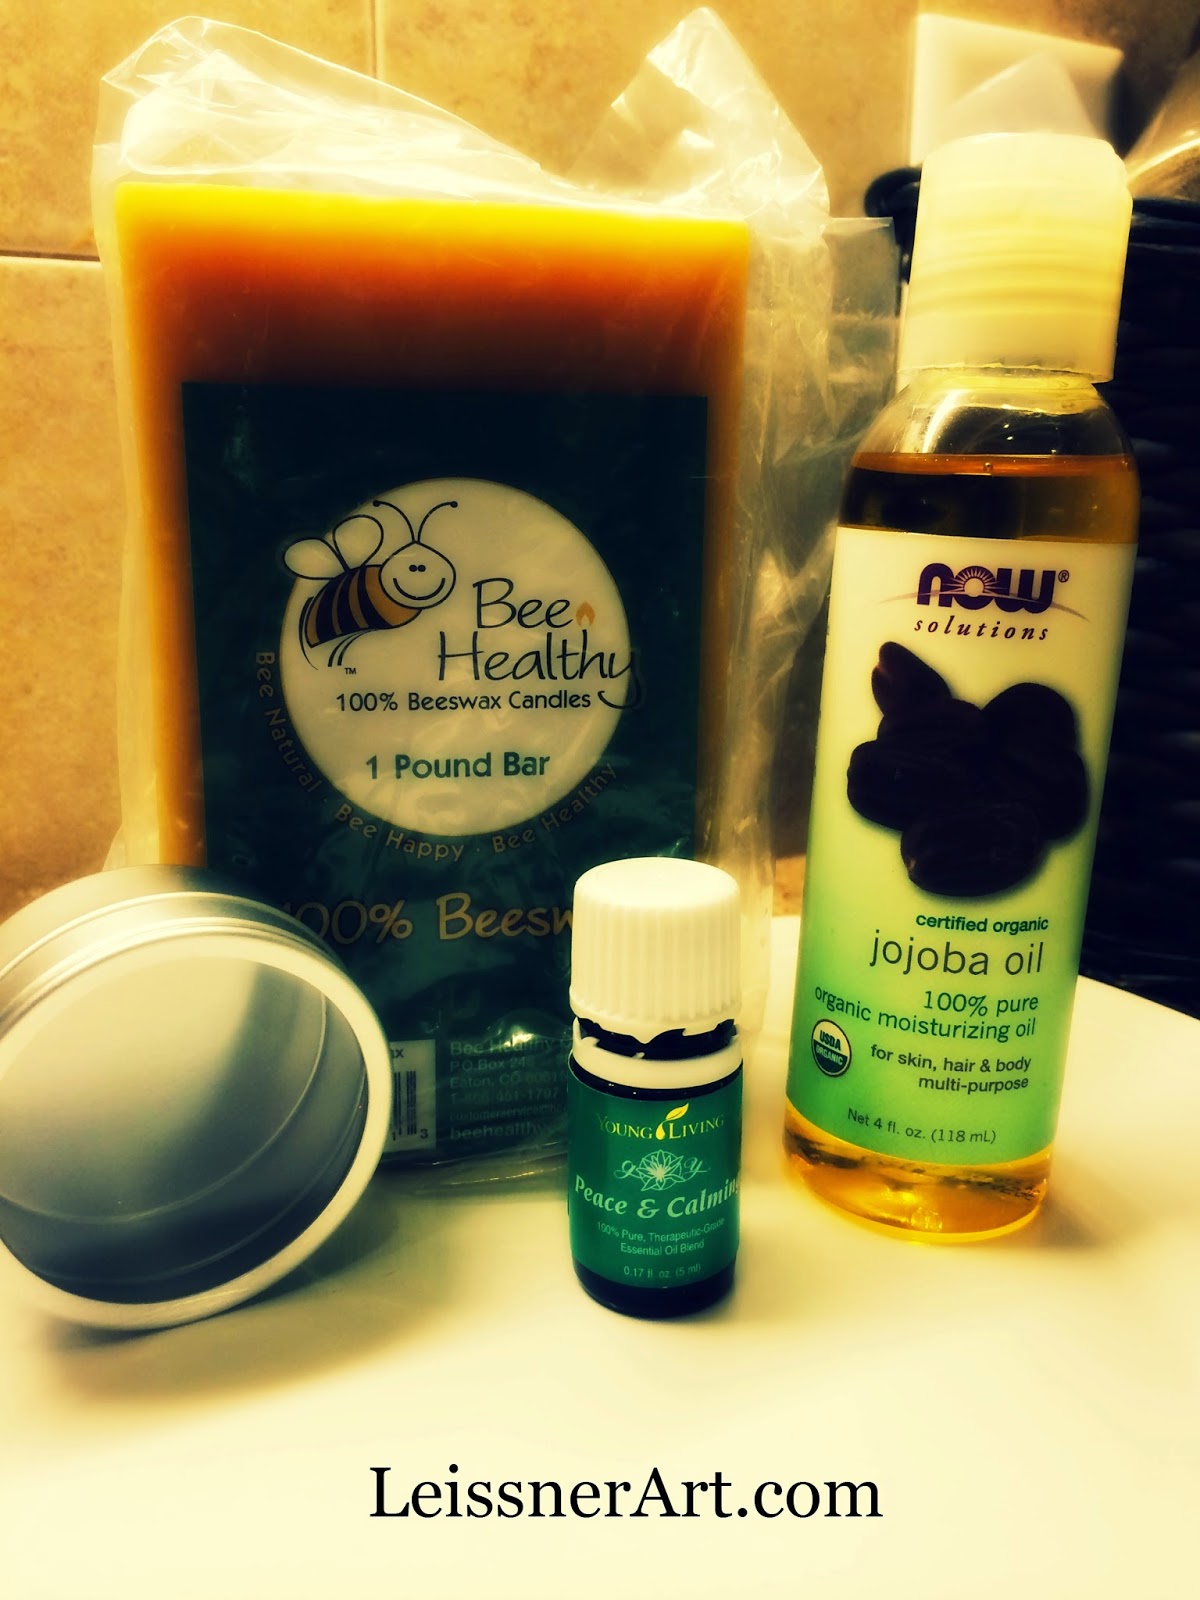
  • Beeswax--Not a giant hunk like this one.  You're only going to use a tablespoon or so.  I used four tablespoons to make three pots of perfume in these 2 inch containers.  I got a block because I tend to overbuy everything and who knows when I might need a pound of beeswax?  I didn't want to buy the kind from the craft store that had a warning label that said, "NOT FOR COSMETIC USE", so I got this at the health food store. There was no warning label. 
  • Jojoba oil--Spend a little more and get organic.  If you are going to the trouble to make something, make it good.
  • Essential Oil--I use Young Living, but you can use other kinds as well, I'm sure.  Just make sure to get all natural, therapeutic grade essential oils. You'll use less, and there'll be no yucky stuff in it.  This is one is called Peace & Calming and has a nice citrusy scent.  I need a lot of both peace and calming, so I thought it would be a good choice for my first attempt at a solid perfume.
  • A container for your solid perfume--It can be any kind of small container that's not made of plastic. You could even reuse your mini Altoid tins.  I got these 2 inch tins from Hobby Lobby.
  • A stir stick--You'll need something disposable you can use to mix the oils with the melted wax.
  • A small glass jar--To melt the wax in.
  • A small saucepan--To heat the water to melt the wax.
  • A shot glass or similar--I discovered trying to drip the oil drop by drop into swiftly hardening wax was not going to work. Collect the drops in a separate small container to make adding them to the wax faster.


 Directions:

1.  Place water in the bottom of a shallow saucepan and place on medium heat.
2.  Chip off the equivalent of 1 Tablespoon of beeswax.  (I used 4 T to fill 3 two inch containers, so adjust as you wish).
3.  Add the wax to the small jar and place in the water. 
4. Add 1Tablespoon jojoba oil to the jar with the wax. (Or the same amount of beeswax you used if you used more.) 
5.  While wax is melting, drip 8-15 drops of essential oils into a shot glass or other small container. (Don't forget to add more if you used more than a tablespoon of wax/jojoba.)
6.  When wax and oil are fully melted together, remove from heat.  


7.  Pour essential oil into the wax mixture and stir well with stir stick.
8.  Pour your lovely smelling liquid wax into your perfume containers.
9.  Let stand until hardened.  It doesn't take very long.  You'll be tempted to poke the wax before it dries.
10. Don't poke it.

I didn't take any pictures while I was trying to cut a print of my artwork to fit in the top. Trying to get a perfect circle in the perfect size is not that easy.   You are probably better at math than I am, though.  It'll be a snap. So...

11.  Decorate the top of your lid. 

12.  Be blessed.


Follow this blog.  There are lots of talented ladies that are going to share fun and fast projects over the course of the Fall and Winter.  Don't miss them.

And join our FB group so you don't miss anything! Cre8iveKlatch

Have a great time, cre8ive friends!

<3 Lori

My Places:
My website--LeissnerArt 
My Etsy Shop 
My Facebook Page 


    Thursday, November 13, 2014

    How To Make Your Own Christmas Holiday Art Tag by Jill Lambert

    Have you looked at your calendar lately? We are rapidly coming up on the holidays...rapidly!!


    Here's a lovely Snowman project sure to bring a little sweet holiday cheer to your decorations!


    I’m a Wisconsin native so I have lots of experience with snow in the winter. Not by choice I will admit though! However, I love snowmen, real ones and painted ones. Not sure why since I’m not a fan of snow or cold weather, other than the first beautiful snowfall or snow at Christmas time. Maybe they remind me of youth, whimsy and just having fun! Here’s one my daughter and I made a few years ago...As you might be able to guess it started melting, then froze again in this crazy yoga backbend.


    Today I’m going to show you how to make a little Christmas holiday tag that you can use to give on a gift or as a little piece of handmade art as well. You could even keep it for yourself and hang it on a doorknob during the holidays if you love it so much you just can’t part with it!

    Materials needed:

    1. Cardboard Piece, cardstock OR pre-cut tag 
    2. Scissors (if need to cut down a size) 
    3. Hole Punch 
    4. Gesso (optional) 
    5. Paints of your Choice - maybe 3-5 colors (I use acrylic) 
    6. Brushes, Water for Cleaning Brushes 
    7. Tools for stamping (stamps, stencil, flat pencil eraser, wine cork, etc.) 
    8. Ribbon 


    1. Cut your cardboard/cardstock to a size you’d like. I made mine 3.5” by 4.75.”

    2. Punch one hole in the top left corner or center. That’s where your ribbon for hanging will go when you’re all done creating.


    3. If you want, cover the cardboard with a layer of white gesso or white paint. I only did this so I could start on a white background. You can paint right on the cardboard if you want, but you just may have to do more layers.


    4. Using stamps and stencils, randomly create marks on your piece. It really can be in any pattern because much of this will be covered up by more paint. It’s nice to just see a few marks underneath your next layer - this gives your piece texture, interest and depth.


    5. Cover your background stamps and marks with a solid color or two if you like. Some of your marks will show through which is what you want. First I used a soft turquoise, then I chose a deep magenta because I’m not much a neutral-color girl. Notice my white circle marks now look a bit red! I can’t really see many of my other marks - that’s okay though! If you want to be sure to see these earlier marks, use a darker paint. Mine clearly wasn't dark enough.


    6. Then I hand-painted some white snowflakes - you can do as many or as little as you want.


    7. Now dip your brush into the white paint, then your water and splatter all over to get the effect of snow falling. 


    8. Now paint the three snowballs of a snowman. I did mine freehand with paint. You can do it in pencil first but I sort of like the look it takes on just doing it freehand first. A funky snowman is a cute snowman I say! I actually did two separate coats of white for the snowman, letting it dry about ten minutes in between.


    9. Now it’s time to add some sweet details like eyes, mouth, carrot nose, twig arms and scarf. You can be as detailed or as simple as YOU want! Other ideas to add: a hat, ornaments hanging from the arms, buttons, a bird on its head, etc.


    10. Next, either use stickers, stencils or hand-paint a festive word above your cute snowman. I used the word “JOY” from stickers I had. I used Mod Podge to attach them - I put the stickers down and put the Mod Podge ON TOP of them. 


    11. Now you can tie your ribbon and call it finished! After the fact I sort of wish I put the hole in the center because it would hang straighter, but I still think its sweet! You could also punch holes on the left and right and thread the ribbon through both of them.

    Other ideas/ways to use your sweet snowman tag:

    • make a few with your kids and hang them from a tree branch from outside that you have in a vase inside for decorations 
    • hang as an ornament 
    • give as teacher gifts to your favorite teachers 
    • use as a gift tag on a present; you can write “to and from” on the front or the back if you don’t want to cover up your art 
    • hang on the corner of a bathroom mirror to add a little holiday decor every time you wash your hands 
    • hang on the inside of a window from the lock so you can see it every time you do dishes at the kitchen sink 

    You can see more of Jill's art and her process at:

    Jill's Dream


    or shop for her lovely creations at:

    Jill's Etsy shop


    And don't forget to come on over and join the cre8ive conversation at our Facebook group: